はてなAPIとS3を使って隊員ごとのブクマ数をブログパーツ化してみた
このブログは複数人で同一アカウントを使って書いていて、だれが書いたかはカテゴリに『X号』ってのをつけて区別してます。
開設から2週間たって記事もたまってきたので、隊員ごとの記事数、はてブ数を表示するブログパーツを作ってみました。
サイドバーの下のほうにこんな感じでついてるやつです。

今のところスマホだと出ません(´・ω・`)
実装について
はてなのAPIで記事情報とブックマーク数を取得してS3にアップロード、ブログパーツから読み込む、という感じで作ってみました。
はてなブログの記事URLとカテゴリははてなブログAtomPubで取得しました。
Basic認証であればcurlコマンドで試せて、こんな感じにXMLで記事リストが取れます。
$ curl --user oretachino:<APIキー> https://blog.hatena.ne.jp/oretachino/oretachino.hatenablog.com/atom/entry

<?xml version="1.0" encoding="utf-8"?>
<feed xmlns="http://www.w3.org/2005/Atom"
      xmlns:app="http://www.w3.org/2007/app">

  <link rel="first" href="https://blog.hatena.ne.jp/oretachino/oretachino.hatenablog.com/atom/entry" />
  <link rel="next" href="https://blog.hatena.ne.jp/oretachino/oretachino.hatenablog.com/atom/entry?page=1417683554" />

  <title>俺たちのブログ</title>
  <link rel="alternate" href="http://blog.oretachino.com/"/>
...
  <entry>
<id>tag:blog.hatena.ne.jp,2013:blog-oretachino-8454420450075581217-8454420450076797777</id>
<link rel="edit" href="https://blog.hatena.ne.jp/oretachino/oretachino.hatenablog.com/atom/entry/8454420450076797777"/>
<link rel="alternate" type="text/html" href="http://blog.oretachino.com/entry/2014/12/12/032757"/>
<author><name>oretachino</name></author>
<title>test-unitさえあればご飯大盛り三杯はイケる</title>
<updated>2014-12-12T03:27:57+09:00</updated>
<published>2014-12-12T03:27:57+09:00</published>
<app:edited>2014-12-12T11:52:39+09:00</app:edited>
<summary type="text">rspec3 に疲弊している皆さんこんにちは。今日は rspec3 に疲れた皆さんへ憩いの場として test-unit gem のお話を提供したいと思います。 test-unit gem について 「Rubyのテスティングフレームワークの歴史(2014年版)」の記事に詳しく書いて…</summary>
<content type="text/x-markdown">rspec3 に疲弊している皆さんこんにちは。今日は rspec3 に疲れた皆さんへ憩いの場として test-unit gem のお話を提供したいと思います。

## test-unit gem について
...
<category term="7号" />

<app:control>
  <app:draft>no</app:draft>
</app:control>

  </entry>

  <entry>
...
記事ごとのはてブ数は、はてなブックマーク件数取得APIを使って取得します。
$ curl 'http://api.b.st-hatena.com/entry.counts?url=http://blog.oretachino.com/entry/2014/12/04/175914&url=http://blog.oretachino.com/entry/2014/12/05/001837'
{
  "http://blog.oretachino.com/entry/2014/12/04/175914":0,
  "http://blog.oretachino.com/entry/2014/12/05/001837":191
}
この2つのAPIを使って、隊員ごとのブックマーク数を取得、S3にアップロードするrubyスクリプトをやっつけ気味に作成してみました。
#!/usr/bin/env ruby
require 'uri'
require 'net/http'
require 'rexml/document'
require 'json'
require 'aws-sdk'
require 'pp'

# はてなブログAPI
BLOG_USERNAME = 'oretachino'
BLOG_API_KEY = '<APIキー>'
BLOG_DOMAIN = 'oretachino.hatenablog.com'
BLOG_API_ENDPOINT = "https://blog.hatena.ne.jp/#{BLOG_USERNAME}/#{BLOG_DOMAIN}/atom/entry"

# はてなブックマーク
BOOKMARK_API_ENDPOINT =  'http://api.b.st-hatena.com/entry.counts'

# AWS
AWS_S3_BUCKET = 'oretachino'
AWS_ACCESS_KEY_ID = '<アクセスキー>'
AWS_SECRET_ACCESS_KEY = '<シークレットアクセスキー>'

# はてなブログのエントリ取得
# TODO: タイトルとかいらん情報取ってる
def get_entries
  entries = {}
  next_endpoint = BLOG_API_ENDPOINT

  while next_endpoint do
    uri = URI.parse next_endpoint
    req = Net::HTTP::Get.new uri.request_uri
    req.basic_auth BLOG_USERNAME, BLOG_API_KEY
    res = Net::HTTP.start(uri.host, uri.port, use_ssl: true)  do |http|
      http.request(req)
    end

    doc = REXML::Document.new(res.body)
    doc.elements.each("feed/entry") do |entry|
      next if entry.elements["app:control/app:draft"].text == 'yes'

      url = entry.elements["link[@rel='alternate']"].attributes["href"]
      title = entry.elements["title"].text
      categories = []
      entry.elements.each("category") do |category|
        categories << category.attributes["term"]
      end

      entries[url] = {}
      entries[url][:title] = title
      entries[url][:account] = categories.find{|c| c =~ /^\d+号$/}
    end

    next_link = doc.elements["feed/link[@rel='next']"]
    next_endpoint = next_link ? next_link.attributes["href"] : nil
  end

  entries
end

# ブックマーク数の取得
# TODO: 1回で取得できる件数は最大50件なので、記事増えたらエラーになる
def get_bookmark_counts(urls)
  uri = URI.parse BOOKMARK_API_ENDPOINT
  path = uri.request_uri + '?' + urls.map{|url| "url=#{URI.escape(url)}"}.join('&')
  req = Net::HTTP::Get.new path
  res = Net::HTTP.start(uri.host, uri.port)  do |http|
    http.request(req)
  end
  JSON.parse(res.body)
end

# S3に書き込み
def write_s3_object(path, json)
  AWS.config(
    access_key_id: AWS_ACCESS_KEY_ID,
    secret_access_key: AWS_SECRET_ACCESS_KEY,
    region: 'ap-northeast-1'
  )
  s3 = AWS::S3.new

  bucket = s3.buckets[AWS_S3_BUCKET]
  object = bucket.objects[path]
  object.write(json, acl: :public_read, content_type: 'application/json')
end

entries = get_entries
bookmark_counts = get_bookmark_counts(entries.keys)
bookmark_counts.each do |url, count|
  entries[url][:bookmark_count] = count
end

counts_by_account = {}
entries.each do |url, entry|
  counts_by_account[entry[:account]] ||= {
    entry_count: 0,
    bookmark_count: 0
  }
  counts_by_account[entry[:account]][:entry_count] += 1
  counts_by_account[entry[:account]][:bookmark_count] += entry[:bookmark_count]
end

write_s3_object('counts_by_account.json', counts_by_account.sort.to_json)
実行すると、こんな感じでS3上にJSONファイルが作成されます。
このスクリプトをテキトウなサーバで15分毎に実行するようにしてます。
[1gou@batch01 ~]$ crontab -l
*/15 * * * * /home/1gou/bin/update_oretachino_counts.rb
S3のバケットは事前に作成しておきます。
設定としてはStatic Website Hostingの有効化と、今回はJSONのまま外部JavaScriptで利用するので、Cross Origin Resource Sharing (CORS)設定も入れておきます。CORS設定はS3バケットのプロパティから『Permissions → Add CORS Configuration → デフォルトのままSave』するだけです。
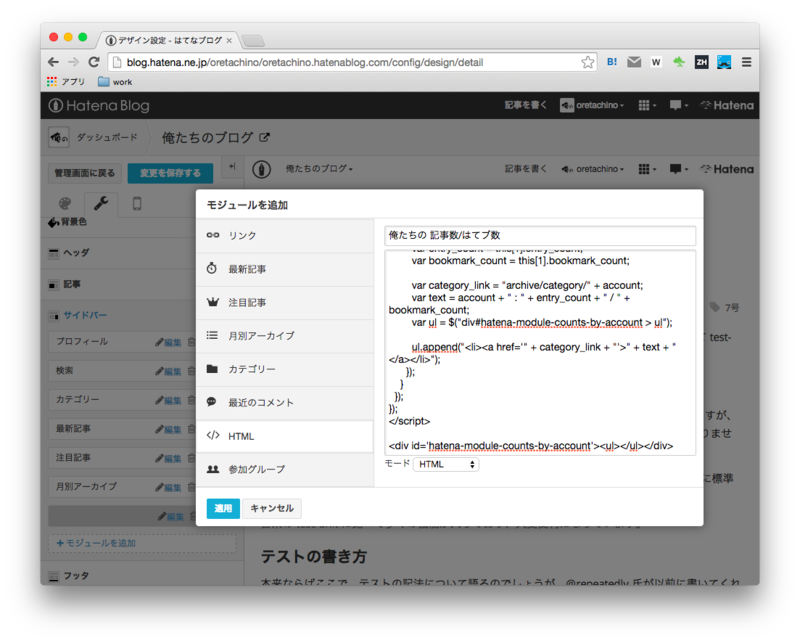
あとは、はてなブログのデザイン設定で、サイドバーのモジュール追加から『HTML』を選択してコードを貼り付けると作業完了です。

貼り付けたHTMLの中身はこんな感じです。
<script type="text/javascript" src="http://ajax.googleapis.com/ajax/libs/jquery/2.1.1/jquery.min.js"></script>

<script type="text/javascript">
$(function() {
  $.ajax({
    type: "GET",
    url: "https://s3-ap-northeast-1.amazonaws.com/oretachino/counts_by_account.json",
    dataType: "json",
    success: function(data) {
      $.each(data, function(){
        var account = this[0];
        var entry_count = this[1].entry_count;
        var bookmark_count = this[1].bookmark_count;

        var category_link = "archive/category/" + account;
        var text = account + " : " + entry_count + " / " + bookmark_count;
        var ul = $("div#hatena-module-counts-by-account > ul");

        ul.append("<li><a href='" + category_link + "'>" + text + "</a></li>");
      });
    }
  });
});
</script>

<div id='hatena-module-counts-by-account'><ul></ul></div>
jqueryをそのまま読み込んでて行儀悪いですね。
まとめ
というわけで、はてなのAPIとS3を使って簡単な初ブログパーツを作ってみました。
しかし6号、7号のはてブ数すげえな・・・